How to break a computer
For as long as I can remember, people have come to me with computer problems. I'm not quite sure why they do it at first — probably my awkward social skills tipping them off — but it's quite clear why they keep coming: I'm usually able to help. A couple of days ago, I was reminded of why I usually know how to help: I do stupidly reckless things that land me in trouble, then I just don't give up trying to solve them.
Late afternoon on March 31, my Windows desktop decided to play an early April's fools joke on me:
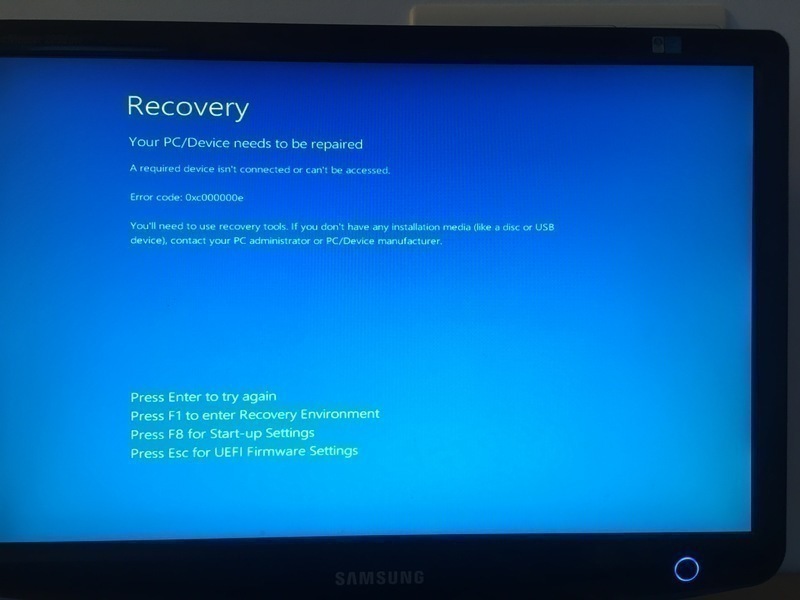
Pressing Enter briefly flashed the screen black. Pressing Esc did nothing.
Pressing either F1 or F8 rebooted the computer and landed me in the BIOS
settings. Things did not look great.
This wasn't a welcome situation, but it wasn't exactly a surprise either. I was hoping it wouldn't happen, but deep down I knew it was a possibility. Well, perhaps not quite exactly that, but definitely something like it.
Let us perhaps rewind to a couple days earlier to understand how I got there. Over the past couple weeks I'd noticed my computer getting slower. Little things at first, but recently it got to the point here right-clicking on any file in the Windows Explorer sent that window spinning for literally over an hour before displaying the drop-down menu. I wanted to resolve that.
I've been listening to Security Now for a few years now (more than I care to count), so I'd heard many tales of how SpinRite can help with these sorts of situations. I happened to have bought a SpinRite license a few years ago as a gesture of support for the podcast, without ever really having needed it so far. I decided I could try running it. It can't possibly do any harm and it may even help.
A very brief summary of SpinRite
Released by the Security Now host around June 2004, SpinRite is a piece of software that forces a hard drive to read (possibly write, depending on provided options) every single byte stored on it. That sometimes has the effect of helping the drive realize when some of its sectors are getting bad, and, in short, pushes the drive to apply its own self-repair mechanisms. Because it ultimately does not do the repair itself, SpinRite works equally well on a wide range of hardware.
I had tried SpinRite in the past, out of curiosity. On fully functioning drives, so it did not produce any spectacular results, but it does mean I had a bootable USB stick around. Or so I thought. When I tried to boot my desktop on that disk, it completely failed to recognize it as a bootable medium.
After a bit of tinkering and research, I eventually managed to figure out the issue (thanks to this blog post): my USB stick had been formatted using a GPT, and somehow that threw my computer off. The solution was simple: I reformatted the drive using the older MBR partition table. That obviously destroyed all records of existing partitions on the key, but that was not an issue as the only data on it was SpinRite itself, and that was easy to recreate.
Armed with that now-for-real-bootable USB stick, I restarted my computer. It
booted on DOS and I typed spinrite. Everything seemd to work well until I got
to the point where SpinRite asks me to select which drives to run it on, and I
was greeted by this ominous error message:
Invalid Partition for Drive Size

This partition exceeds the size of this drive as defined by the system's
BIOS or BIOS extension.

You should NOT PROCEED to use SpinRite on this drive until you have
verified and corrected the disparity between this drive and BIOS's or BIOS
extension's understanding of the drive size.
which eventually lead me to this SuperUser post which explains that this is because SpinRite won't work on GPT-formatted drives. Again, the next step is clear: I need to reformat my drives as MBR. But hang on, last time I did that it wiped the partitions. I would rather keep my data if possible.
I made a live Ubuntu USB stick and rebooted my computer, and ran my go-to
disk edition tool gparted. Looking at the various options and error
messages it displayed lead me to believe that while it could write an MBR, it
would write a blank new one and in the process render all of my existing data
inaccessible, which isn't quite what I wanted. I also noticed a couple error
messages in the Ubuntu startup process but at that point they seemed harmless
so I decided to ignore them.
With gparted out, I needed another tool. A bit more research lead me to the
gdisk utility, which could apparently convert a GPT to MBR format without
loss of information. Tweaking partition tables is a dangerous process that can
result in massive data losses, and you should never do it. But I do it
frequently enough, and I've been doing it for a long time now. I'm well aware
of the dangers and I (usually) only do it after taking the appropriate backup.
In this case, however, my Windows desktop is my biggest drive so taking a
backup is inconvenient. It's also a computer I use pretty much only for gaming,
so the data in there is not that important. I still wanted to be prudent,
though, so I first converted a couple of USB keys I had lying around. They both
went through the GPT -> MBR transition with no loss of data whatsoever, so that
seemed like a great sign. I then moved on to my secondary, smaller-but-SSD
"hard drive" (D:), and there again the change was a complete success: not
only did the new partition talbe point to the same partitions with no data
change as seen from the live Ubuntu system, when I next booted into Windows it
still mapped the same partition to D: and nothing seemed to be affected.
A few days later, I decided to convert my main drive. I once again booted
under Ubuntu, ignored the error messages, started gdisk, and went through the
same process. I did hesitate a tiny bit when gdisk offered to save the
existing GPT before overwriting it. Having a backup would be nice. But I was
under a live USB environment, with no clear place to store said backup. My live
USB environment seemed to die after a few minutes every time I started it, so I
did not want this to take too long. Should that have been a warning sign of
bad things about to happen? I'll let you decide.
I proceeded with the transfer. Then I looked at the drive in the live USB system, and everything seemed to still be there. Then I rebooted, and was greeted by the screenshot above.
At that point I was puzzled. I'd heard horror stories about Windows 10 and "secure boot" making it impossible to boot on anything else than a Microsoft-sanctioned partition, and contemplated having to just throw away the entire disk. I spent maybe an hour researching that, and trying to find any "secure boot"-related option in my BIOS. I eventually concluded that this was not the issue. The error message I was getting was apparently one coming from Windows itself, which seemed to indicate that at the very least the BIOS was not preventing it from trying to boot.
I looked a bit further. At that point I was spending a lot of time in that Ubuntu live-USB environment, and having it freeze after a couple minutes was becoming a bit of an inconvenience. At startup, just before it showed the desktop of the live environment, it printed a bunch of messages (probably multiple screens worth; it went by very fast and eventually stopped the stream with a single visible screen full of them):
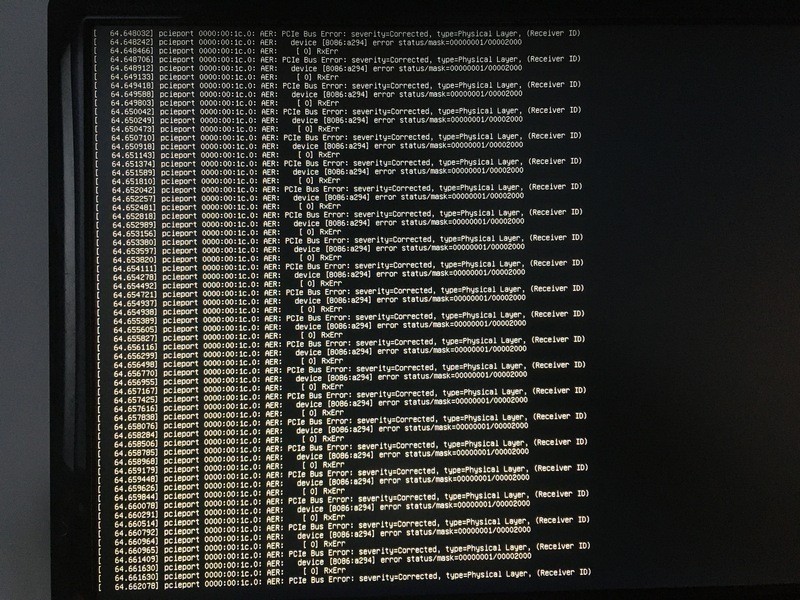
When my Linux system froze once again and I reached the end of my patience for
that particular issue, I tried one of my old tricks: CTRL+ALT+Fx. Most Linux
systems are still built with multi-user in mind, and by default start a handful
of virtual terminals, typically 1 through 8. These can be accessed using
CTRL+ALT+Fx, where x is the associated terminal number, and the GUI is
generally displayed on terminal 2. (This is just my experience; I have no hard
data or explanation to back this up.) On every other terminal, I saw a constant
stream of what seemed like the exact same error messages as in the above
screenshot, so by this point I decided I could not ignore them anymore.
Again, I turned to the internet, and eventually found a stackoverflow answer that suggested passing an argument, pci=nommconf, to the
kernel. Even more research led me to this post explaining
how to pass kernel options to a live-USB Ubuntu system. I can't say I
understand the explanations for what exactly that option does, but it did fix
my issue.
As I couldn't see anything wrong with the disk, I tried a few random things in
that Ubuntu environment. Turning the disk back to GPT didn't help. Running
boot-repair didn't help, despite trying many different sets of options, on
both an MBR and a GPT version of the disk. I was close to giving up when I
decided to give another read to that Windows error message, and noticed it
suggested using "recovery mode". It was time to give those Windows tools a try.
I downloaded a bootable Windows image, managed to make it bootable (MBR partition, etc., I'm pretty used to this part by now) and started what looked like the Windows installation process. That seemed bad, as reinstalling Windows was likely to break all sorts of things, if not outright delete everything. It took me a while to notice it, but on the second screen there is actually a small button to start the recovery tools.
I first tried the big "Repair boot process" button, and that proudly claimed to have done something, then rebooted my computer, which landed me back on the exact same error. Trying to run it again (you never know) now simply stated it could not repair my boot process.
I tried another button: start a Windows terminal. I tried to run
bootrec.exe, which is touted as the Windows boot process repair tool. That
did not repair it either, despite (also) claiming it had.
Further research suggested two things to try: editing partitions using
diskpart and fixing the "boot configuration data". I played around
with diskpart, mostly listing things. I noticed my main parititon was mounted
as H:, but didn't think much of it at first. After all, I was in a recovery
environment, so I expected the recovery image itself to mounted on C:.
I tried various things in diskpart, including swapping drive letters around,
but none of it seemed to "take": when I restarted, it always came back with my
main partition as H:. I read a bit about how drive letters may be mapped in
the registry and how to edit that, but that seemed to assume you had
a working Windows environment.
Since it looked like something, somewhere, had cached the wrong drive letter
mapping, I decided to try the clean command in diskpart. The in-program
description was innocuous enough, along the lines of "clean hard drive", and
the program did not ask for any kind of confirmation. When I ran list volumes
right after that, however, instead of showing me all of my partitions without
any drive letter assigned, as I expected, it showed me none of my partitions.
That looked bad. No partitions at all.
I rebooted onto the live Ubuntu system, and I saw the same thing: no partition at all on that drive. This was a bit of a low point.
Fortunately, this is a low point I had already reached years ago when playing
with gparted on some friend's disk, so I had a few ideas of what to try. I
reached out to the testdisk program, which promptly rebuilt a working MBR
for the disk. I'm not entirely sure it recovered all of the partitions — I
never took a picture, but it feels like there were four before and now there
were only three. Regardless, it still had the ones I cared about (UEFI boot
sequence, Windows recovery, and the actual Windows partition), so I counted
that as good enough for now. If nothing else, I should be able to recover my
Windows files manually.
I kept poking around at that Windows recovery terminal. One thing I just could
not figure out was how it would know where to save things. In particular,
bootrec did not seem to take any parameter to tell it where to store its
output, and in the broken state of my system I could see no obvious way for it
to know.
I tried a few things that did not work and did not keep very good notes (through any of this story, really), but I think what eventually worked was to:
- Remap all the drives to their correct (i.e. old) partition letter in
diskpart. - Erase, then recreate, the UEFI boot files using the
bcdbootcommand, on the UEFI partition. - Run
bootrec. - Reboot.
I almost did not believe it when I finally was greeted by my login screen once again.