Forwarding emails with SES and Terraform
A few weeks ago, I had a bit of a scramble when I realized, on Saturday, that the corporate emails I'm responsible for would suddenly stop working on the following Monday, two days later.
A few weeks prior, I had decided to switch DNS provider. I had been unhappy with the service I was getting for about a year, but DNS is a bit of a dangerous thing to tinker with, so I'd put it off. It also has a tendency to fade into the background, as (at least at the level of complexity I'm at) it's very slow-changing.
Changing the DNS setup itself was not too difficult after a bit of research. I set up a new DNS zone on Route53, copying most of the existing entries, and started the transfer from my old registrar to AWS.
The transfer takes about ten days for various reasons. On Friday, I received confirmation that the switch would be executed on Monday. On Saturday, I suddenly realized that my old registrar was providing me with a bit more than DNS services: it was also forwarding emails. It was too late to cancel the transfer.
Email forwarding is a service a lot of DNS providers offer, but Route53 does not. So I started frantically researching how to actually do that with AWS, and since I had a bit of trouble putting all the pieces together, I decided to record the results of that research here.
AWS blog to the rescue
After quite a bit of research, mostly about finding the right keywords to Google for, I eventually found this blog post on the AWS blog itself. It was not immediately apparent to me that this was the post I needed; among other things, I spent quite a bit of time doing additional research because I thought surely there was a simpler way to do this. I did not find one.
If you have that problem, and you're happy clicking around, the AWS post has everything you need. Me, I like text-based representations of my infrastructure, so what follows is an annotated transcription of the AWS blog to Terraform syntax.
All of the code snippets in this post are meant to be part of a single Terraform file.
Setting up the provider
Any Terraform configuration must start with a provider, which tells Terraform which API it's going to interact with and how to do that. (A single Terraform configuration can have multiple providers, but we're not going to do that here.) Here's one way to set up the AWS provider:
terraform {
  required_providers {
    aws = {
      source  = "hashicorp/aws"
      version = "~> 3.0"
    }
  }
}

provider "aws" {
  region = "us-east-1"
}
The first block instructs Terraform itself to download and install an
appropriate version of the AWS provider (typically through the terraform init
command), and the second block sets the options for the AWS provider. There are
more options that could be set, but we're keeping it simple for now.
Because we're not setting up any credentials in the above configuration, the
AWS provider will expect to find the AWS credentials in the usual env vars
(AWS_ACCESS_KEY_ID and AWS_SECRET_ACCESS_KEY) when the terraform command
is invoked. There are other ways to pass credentials.
Next, we're going to set up two variables that we'll use later on:
data "aws_region" "current" {}
data "aws_caller_identity" "current" {}
The two data blocks query the current configuration of the AWS provider to
extract the default zone (which we set up in the provider configuration block
just above) and the ID of the current user, which the AWS provider will be able
to derive from the credentials at run time.
DNS configuration
In order to make this blog self-contained, the next block set up a minimal DNS zone for the domain. In practice, it's likely that by the time you want to add email forwarding, you already have a zone somewhere.
resource "aws_route53_zone" "zone" {
  name     = "$YOUR_DOMAIN"
  tags     = {}
}
This creates a minimal valid zone, i.e. one with appropriate SOA and NS
entries. (See my DNS overview if you're not sure what those are, and
you're interested. It's not very relevant to email forwarding per se.) You'll
obviously need to change $YOUR_DOMAIN to your own domain if you plan to reuse
any of this.
For email forwarding to work, we'll need two records in the DNS zone. First, we need to prove to our email provider (AWS SES) that we're really the owner of the domain, so it can feel good about sending emails in the name of that domain.
So, to prove we own the DNS zone, we need to insert a special TXT record in the zone, which SES gives us. Fortunately, we don't have to copy-paste between two screens in the AWS console and can instead use an API for that. In Terraform terms:
resource "aws_ses_domain_identity" "primary" {
  domain = aws_route53_zone.zone.name
}

resource "aws_route53_record" "ses_verif" {
  zone_id = aws_route53_zone.zone.zone_id
  name    = "_amazonses.${aws_ses_domain_identity.primary.id}"
  type    = "TXT"
  ttl     = "600"
  records = [aws_ses_domain_identity.primary.verification_token]
}

resource "aws_ses_domain_identity_verification" "ses_verif" {
  domain = aws_ses_domain_identity.primary.id

  depends_on = [aws_route53_record.ses_verif]
}
The first block tells SES that we'd like to register a domain for email sending and receiving; the second block creates an appropriate record in the DNS zone. The third block is a bit special, as Terraform resources go, as it is not creating anything on the AWS side. Instead, this is just going to wait until SES aknowledges the verification of the domain identity, i.e. until SES is able to witness the new DNS record we just created.
Finally, in order for emails to work with our domain, we need an MX record that tells other mail servers where to send their @ourdomain emails.
resource "aws_route53_record" "email" {
  zone_id = aws_route53_zone.zone.zone_id
  name    = aws_route53_zone.zone.name
  type    = "MX"
  ttl     = "600"
  records = ["10 inbound-smtp.${data.aws_region.current.name}.amazonaws.com"]
}
And that's it for the DNS setup.
Storing received emails: S3 bucket
There does not seem to be a way to tell SES to directly forward emails. Instead, what we're going to do is set up a series of two actions to be taken upon receiving an email. The actions are:
- Save the email as a binary blog in an S3 bucket. This is a "direct" action supported natively by the SES machinery.
- Fetch the file from the S3 bucket and send it as an email to some other email address. This is not a native SES action, so instead we're going to implement that through a call to AWS Lambda (with the code of the Lambda function itself kindly provided by the AWS blog post).
If you have an existing bucket, you could obviously use that. Keeping with the spirit of making this post self-contained, we're going to create a brand new bucket for this.
resource "aws_s3_bucket" "email" {
  bucket = "$YOUR_BUCKET_NAME"
  acl    = "private"
}
Obviously, you'll need to come up with a better name for the bucket (if only
because $ is not a valid character for bucket names). In the rest of this
configuration, we assume the bucket might be used for other things too and will
configure this system to store emails under the email/ prefix (thinking
"folder" here is not quite right, but good enough for most use-cases).
Creating a bucket is not quite enough, though: we also need to give SES the
ability to write to that bucket, restricted to the email/ prefix because
least privilege is a good default. We do that with the following policy:
resource "aws_s3_bucket_policy" "email" {
  bucket = aws_s3_bucket.email.id

  policy = <<EOF
{
  "Version": "2012-10-17",
  "Statement": [
    {
      "Sid": "AllowSESPuts",
      "Effect": "Allow",
      "Principal": {
        "Service": "ses.amazonaws.com"
      },
      "Action": "s3:PutObject",
      "Resource": "${aws_s3_bucket.email.arn}/email/*",
      "Condition": {
        "StringEquals": {
        "aws:Referer": "${data.aws_caller_identity.current.account_id}"
        }
      }
    }
  ]
}
EOF
}
More precisely, this gives the PutObject permission for the SES service if
and only if it is currently being directed by our own account, and only for S3
objects under the email/ prefix.
Sending stored emails: Lambda
The next step is to setup AWS Lambda to send emails from that bucket. First, of course, we'll have to setup the appropriate permissions.
resource "aws_iam_role" "email" {
  name               = "$YOUR_ROLE_NAME"
  path               = "/"
  tags               = {}
  assume_role_policy = <<EOF
{
  "Version": "2012-10-17",
  "Statement": [
    {
      "Action": "sts:AssumeRole",
      "Principal": {
        "Service": "lambda.amazonaws.com"
      },
      "Effect": "Allow",
      "Sid": "AllowLambdaAssumeRole"
    }
  ]
}
EOF
}

resource "aws_iam_policy" "email" {
  name = "$YOUR_POLICY_NAME"
  tags = {}

  policy = <<EOF
{
  "Version": "2012-10-17",
  "Statement": [
    {
      "Sid": "AllowLambdaToCreateLogs",
      "Effect": "Allow",
      "Action": [
        "logs:CreateLogStream",
        "logs:CreateLogGroup",
        "logs:PutLogEvents"
      ],
      "Resource": "*"
    },
    {
      "Sid": "AllowLambdaToSendEmails",
      "Effect": "Allow",
      "Action": [
        "s3:GetObject",
        "ses:SendRawEmail"
      ],
      "Resource": [
        "${aws_s3_bucket.email.arn}/email/*",
        "arn:aws:ses:${data.aws_region.current.name}:${data.aws_caller_identity.current.account_id}:identity/*"
      ]
    }
  ]
}
EOF
}

resource "aws_iam_role_policy_attachment" "email" {
  role       = aws_iam_role.email.name
  policy_arn = aws_iam_policy.email.arn
}
Now, that's a bit of a mouthful, so let's step through each block. It's really
not as complex as its verbosity might suggest. The first block creates a new
role and gives Lambda the ability to assume that role. The second block defines
a policy, which says that whoever has that policy can create logs, read from
our bucket (under the email/ prefix), and send emails (as long as they're
directed by our account). Finally, the third block assigns that policy to the
role we just created.
With all of that permission set up, we can now create the Lambda function itself. First, we're going to create a zip file with the Python code given in the AWS blog post:
data "archive_file" "email" {
  type        = "zip"
  source_file = "forward_email.py"
  output_path = "work/lambda.zip"
}
AWS Lambda wants a zip file, but storing zip files in git is bad. This
allows us to check in the Python file itself (as forward_email.py in the same
folder as our Terraform file). The work folder here is assumed to be ignored
by git (through .gitignore).
Then, we create the function proper:
resource "aws_lambda_function" "email" {
  filename      = data.archive_file.email.output_path
  function_name = "email-forwarder"
  role          = aws_iam_role.email.arn
  handler       = "forward_email.lambda_handler"
  timeout       = 30
  tags          = {}

  source_code_hash = filebase64sha256(data.archive_file.email.output_path)
  runtime          = "python3.9"
  environment {
    variables = {
      MailS3Bucket  = aws_s3_bucket.email.bucket
      MailS3Prefix  = "email"
      MailSender    = aws_ses_email_identity.email.email
      MailRecipient = aws_ses_email_identity.email.email
      Region        = data.aws_region.current.name
    }
  }
}
The environment variables are documented in the AWS blog post, or can be
gleaned by reading the Python code. Importantly, the prefix here must match the
prefix in our permissions, but does not include the final /. Also note that
the handler property must be the name of the Python file followed by the
name of the function to call in said file.
Tying thing together with SES rule set
Finally, we need to tell SES that, upon receiving an email, it needs to store it on S3 and then fire the Lambda function. First, we need to create a "rule set" and make it "active". Note that you can only have one active rule set per account, so if you're working with an account that already has existing resources, this may generate a conflict, or silently disable your existing rule set and replace it with this one. If you're not sure, do check whether you already have a rule set, and add the rule to the existing active rule set instead of creating a new one.
Keeping with the spirit of self-containedness, here I'll assume there is no prior rule set and we can just create a new one and designate it as active.
resource "aws_ses_receipt_rule_set" "primary" {
  rule_set_name = "primary"
}

resource "aws_ses_active_receipt_rule_set" "primary" {
  rule_set_name = aws_ses_receipt_rule_set.primary.rule_set_name
}
Now, we can add a rule to that rule set. There's a bit of a tricky part here, though. We want to create a rule that will trigger a Lambda function, and to do that, we need to give the rule the permission to call the Lambda function. However, in order to create the permission that would allow the rule to call the Lambda function, we need to have the ARN ("Amazon Resource Name", a resource's global ID on AWS) of the rule itself. So in order to create the rule, we need to have the rule already created.
We can break that dependency cycle by first creating the rule without the Lambda action, then adding the permission, and then adding the action to the rule. But Terraform does not do step-wise deployments like that, at least as far as I know, so we'll need to run Terraform twice. What this looks like in practice is that we'll run Terraform once with the action commented out, then uncomment the action, and run it again. On the second run, the only thing it will do is add that one action to the — now-existing and permissioned — rule.
With that out of the way, here is the rule, with the Lambda action commented out:
resource "aws_ses_receipt_rule" "email" {
  name          = "$RULE_NAME"
  rule_set_name = aws_ses_receipt_rule_set.primary.rule_set_name
  recipients    = ["me@$YOUR_DOMAIN", "other-me@$YOUR_DOMAIN"]
  enabled       = true
  scan_enabled  = false

  s3_action {
    position          = 1
    bucket_name       = aws_s3_bucket.email.bucket
    object_key_prefix = "email/"
  }
  # Needs commenting on first deployment because of circular
  # dependency between this and lambda permission.
  /*
  lambda_action {
    position     = 2
    function_arn = aws_lambda_function.email.arn
  }
  */
}
The recipients key lists the email addresses you want to forward. Any email
sent to an address on your domain that is not matched by a rule in the active
rule set is going to be dropped, so it's important to cover all the email
addresses you want to forward here.
And here is the permission for SES to invoke the lambda:
resource "aws_lambda_permission" "email" {
  statement_id   = "AllowExecutionFromSES"
  action         = "lambda:InvokeFunction"
  function_name  = aws_lambda_function.email.function_name
  principal      = "ses.amazonaws.com"
  source_account = data.aws_caller_identity.current.account_id
  source_arn     = aws_ses_receipt_rule.email.arn
}
The final touch
We're almost done. The astute reader will have noted that, when we set up the
Lambda function, we set the MailSender and MailRecipient values to
aws_ses_email_identity.email.email, whereas we have not (yet) created an
email resource of type aws_ses_email_identity. So we need to do that. It's
a fairly simple-looking resource:
resource "aws_ses_email_identity" "email" {
  email = "$YOUR_EMAIL"
}
It's a bit special, though, like aws_ses_domain_identity_verification: while
this one does create a record at the SES level, it will also wait for
confirmation. The creation of this resource will trigger an email from AWS to
the given email address, and the terraform apply command will wait until the
link in said email has been clicked, validating that the owner of that address
agrees to let SES send emails on their behalf.
Conclusion
There you have it. It's a bit more complex than I'd have liked, but this is the simplest way I could find to set up email forwarding on AWS. If you know a simpler way, please let me know.
It should also be noted that, as email forwarding goes, this is not exactly
what I was expecting. With my previous provider, forwarded emails got into my
inbox pretty much as they had been sent, with even the to field appearing to
still point to the original destination.
Instead, with the above setup, I get this:
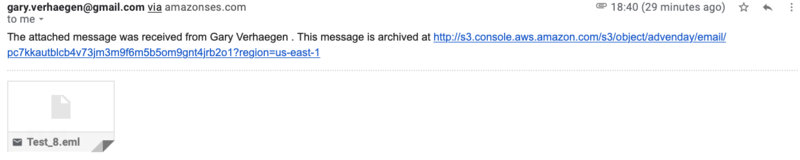
I.e. an email from myself to myself, with a link to the S3 bucket and the entire original email as a single text file attachment (and thus original attachments as base64-encoded text within that).
That's obviously not ideal.